安装篇 下载安装 1 2 3 4 5 6 7 8 9 curl -O https://fastdl.mongodb.org/linux/mongodb-linux-x86_64-rhel62-3.2.10.tgz tar zxvf mongodb-linux-x86_64-rhel62-3.2.10.tgz mv mongodb-linux-x86_64-rhel62-3.2.10 /usr/local/ mv mongodb-linux-x86_64-rhel62-3.2.10 mongodb mkdir /data/db touch /var/logs/mongodb/mongodb.logs cd mongdb/bin && vim mongodb.conf
配置mongodb.conf 1 2 3 4 5 6 dbpath=/data/db logpath=/var/logs/mongodb port=27017 #fork=true #nohttpinterface=true
重新绑定mongodb的配置文件地址和访问IP /usr/local/mongodb/bin/mongod --bind_ip localhost -f /usr/local/mongodb/mongodb.conf/usr/local/mongodb/bin/mongod --help 查看帮助 ,其中 -f(–config) 配置文件,–bind_ip 绑定ip/usr/local/mongodb/bin/mongod --config /usr/local/mongodb/mongodb.conf 添加到 /etc/rc.d/rc.local 开机启动
测试 其中 mongod --config /usr/local/mongodb/mongodb.conf 服务之后,启动 /usr/local/mongodb/bin/mongo 客户端,支持JavaScript 版本,show dbs 查看数据库,db.version() 查看版本
查看当前mongodb进程信息 ps -ef | grep mongod //查看进程号码
php的扩展与测试 扩展包地址
1 2 3 4 5 cd mongodb-1.1.9 /usr/php/bin/phpize ./configure --with-php-config=/usr/askphp/bin/php-config make;make install
PHP代码 创建集合 1 2 3 $m = new \MongoClient ();$db = $m ->selectDB ("test" );$collection = $db ->createCollection ("my_col" );
插入文档 1 2 3 4 5 6 7 8 9 10 11 $m = new \MongoClient ();$db = $m ->selectDB ("test" );$collection = $db ->my_col;$document = array ( "title" => "MongoDB" , "description" => "database" , "likes" => 100 , "url" => "http://www.baidu.com" , "by" =>"change.net" ); $ret_ins = $collection ->insert ($document );
查找文档 1 2 3 4 5 6 7 $m = new \MongoClient ();$db = $m ->selectDB ("test" );$collection = $db ->my_col;$cursor = $collection ->find ();foreach ($cursor as $document ) { echo $document ["title" ] . "\n" ; }
更新文档 1 2 3 4 5 6 7 8 $m = new \MongoClient ();$db = $m ->selectDB ("test" );$collection = $db ->my_col;$collection ->update (array ("title" =>"MongoDB" ), array ('$set' =>array ("title" =>"MongoDB" )));$cursor = $collection ->find ();foreach ($cursor as $document ) { echo $document ["title" ] . "\n" ; }
删除文档 1 2 3 4 5 6 7 8 9 $m = new \MongoClient ();$db = $m ->selectDB ("test" );$collection = $db ->my_col;$collection ->remove (array ("title" =>"MongoDB" ), array ("justOne" => true ));$cursor = $collection ->find ();foreach ($cursor as $document ) { echo $document ["title" ] . "\n" ; }
使用篇 Start Mongod && Command 1 2 3 4 5 6 7 8 9 10 11 12 13 14 15 16 17 18 19 20 21 22 23 24 25 26 27 28 29 30 31 32 mongod ps aux | grep mongo mongo show dbsuse meals- development show collectionsshow usersshow rolesshow profileshow databasesdb.auth() db.help() db.collection.help() db.collection.find().help() db.collection.findOne() db.collection.find().toArray() db.collection.insert() db.collection.update() db.collection.save() db.collection.remove() db.collection.drop() db.collection.createIndex() db.getSiblingDB()
Data Types 类型比较 参考
Date
Date() method which returns the current date as a string.
new Date() constructor which returns a Date object using the ISODate() wrapper.
ISODate() constructor which returns a Date object using the ISODate() wrapper.
ObjectId new ObjectId
NumberLong && NumberInt NumberLong(“2090845886852”)。demo:
db.collection.insert( { _id: 10, calc: NumberLong(“2090845886852”) } )
db.collection.update( { _id: 10 },{$inc:{ calc: NumberLong(5) } } )
Check Types
instanceof – mydoc._id instanceof ObjectId
typeof – typeof mydoc._id
SQL && MongoDB Mapping Chart sql与nosql的不同于区别参考
Executables |MySQL/Oracle | MongoDB
Terminology and Concepts
SQL Terms/Concepts
MongoDB Terms/Concepts
database
database
table
collection
row
document or BSON document
column
field
index
index
table joins
embedded documents and linking
primary key,Specify any unique column or column combination as primary key.
primary key,In MongoDB, the primary key is automatically set to the _id field.
Create and Alter and CURD 1 2 3 4 5 6 7 8 9 10 11 12 13 14 15 16 17 18 19 20 21 22 23 24 25 26 27 28 29 30 31 32 33 34 35 36 37 38 39 40 41 42 43 44 45 46 47 48 49 50 51 52 53 54 55 56 57 58 59 60 61 62 63 64 65 66 67 68 69 db.users.insert( { user_id: "abc123", age: 55 , status: "A" } ) db.createCollection("users") db.users.ensureIndex( { user_id: 1 } ) db.users.ensureIndex( { user_id: 1 , age: -1 } ) db.users.drop() db.users.find() db.users.find( { }, { user_id: 1 , status: 1 } ) db.users.find( { }, { user_id: 1 , status: 1 , _id: 0 } ) db.users.find( { status: "A" }, { user_id: 1 , status: 1 , _id: 0 } ) db.users.find( { age: { $gt: 25 , $lte: 50 } } ) db.users.find( { user_id: / ^ bc/ } ) db.users.find( { status: "A" } ).sort( { user_id: 1 } ) db.users.count () db.users.find().count () db.users.count ( { user_id: { $exists : true } } ) db.users.find( { user_id: { $exists : true } } ).count () db.users.count ( { age: { $gt: 30 } } ) db.users.find( { age: { $gt: 30 } } ).count () db.users.distinct( "status" ) db.users.findOne() db.users.find().limit(1 ) db.users.find().limit(5 ).skip (10 ) db.users.find( { status: "A" } ).explain() db.users.update( { age: { $gt: 25 } }, { $set : { status: "C" } }, { multi: true } ) db.users.update( { status: "A" } , { $inc: { age: 3 } }, { multi: true } ) db.users.remove( { status: "D" } ) db.users.remove( )
详细使用 INSERTING DATA 1 2 3 4 5 6 7 8 9 10 11 12 13 14 15 16 17 18 19 20 21 22 23 24 25 26 27 28 29 30 31 32 33 34 35 36 37 38 39 40 41 42 43 44 45 46 47 48 49 50 51 52 53 54 55 56 57 58 59 60 61 62 63 64 65 66 67 68 db.customers.insert({ first_name: "chris", last_name: "aiv" }) db.customers.insert({ first_name: "Peter", age: 32 , address: { street: "120 Main St", city: "Chicago", state: "Illinois", zip: "38475" }, phone: { home: "5555555555", work: "4444444444", mobile: "3333333333" }, services: [ { service_id: "time warner" }, { service_id: "pge" }, { service_id: "moviepass" } ], services_count: 3 }); db.customers.insert({ first_name: "Billy", last_name: "Corgan", gender: "m" }) db.customers.insert([ { first_name: "Jimmy", last_name: "Hendrix" }, { first_name: "Jimmy", last_name: "Page" }, { first_name: "Kurt", last_name: "Cobain" }, { first_name: "Adrian", last_name: "Belew" }, { first_name: "Billy", last_name: "Corgan" } ])
FINDING DATA 1 2 3 4 5 6 7 8 9 10 11 12 13 14 15 db.customers.find({ first_name: "Peter"}, { services: 1 }) db.customers.find({ first_name: "Peter"}, { "services.service_id": 1 }) db.customers.findOne( { first_name: / ^ billy$/ i }, { first_name: 1 } ) db.customers.find({ gender: "male" }) db.customers.find({ gender: / (m| male)/ i, first_name: / ^ billy$/ i })
UPDATING DATA 1 2 3 4 5 6 7 8 9 10 11 12 13 14 15 16 17 18 19 20 21 22 23 24 25 26 27 28 29 30 31 32 33 34 35 36 37 38 39 40 41 42 43 44 45 46 47 48 49 50 51 52 53 54 55 56 57 58 59 db.customers.update( { first_name: "Jimmy" }, { last_name: "Hendrix"} ) db.customers.update( { last_name: / ^ hendrix$/ i }, { $set : { first_name: "Jimmy" } } ) db.customers.update( { first_name: "Billy" }, { $inc: { age: 1 } } ) db.customers.update( { _id: ObjectId("581fef808e5fac221dea48ef") }, { $set : { first_name:"Lucy", gender: "m", age: 40 , birthdate: new Date ("2016-11-02") } } ) db.customers.update( { first_name: "Jimmy" }, { $set : { gender: "male", age: 50 , birthdate: new Date ("Aug 20, 1985") } }, { upsert: true } ) db.customers.update( { first_name: "Jimmy" }, { $push: { services: { service_id: 'hosting windows' , service_name: "windows hosting" } } } ) db.customers.update({first_name:"jack"},{$inc:{age:2 }},true ); db.customers.update({first_name:"Jimmy"},{$inc:{age:3 }},false ,true ); db.customers.update({first_name:"Kurt"},{$inc:{age:-2 }});
REMOVING DATA 1 2 3 4 5 6 7 8 9 10 11 12 13 14 15 16 17 18 19 db.customers.update( { last_name: "Page" }, { $unset: { age: 1 } } ) db.customers.update({first_name:"jack"},{$inc:{age:1 }}) db.customers.remove( / / ! ! ! DO NOT US THIS { first_name: "Billy"}, true ) db.customers.remove( { age: { $gt: 31 } } , true )
DELETING DATA SEARCHING DATA 1 2 3 4 5 6 7 8 9 10 11 12 13 14 15 16 17 18 19 20 21 22 23 24 25 26 27 28 29 30 31 32 33 34 35 36 37 38 { _id: 1 , name: { first : 'John' , last : 'Backus' }, birth: new Date ('Dec 03, 1924' ), death: new Date ('Mar 17, 2007' ), contribs: [ 'Fortran' , 'ALGOL' , 'Backus-Naur Form' , 'FP' ], awards: [ { award: 'National Medal' , year : 1975 , by : 'NSF' }, { award: 'Turing Award' , year : 1977 , by : 'ACM' } ] } db.users.find({awards: {$elemMatch: {award:'National Medal' , year :1975 }}}) db.col.find({"by":"菜鸟教程"}).pretty() db.col.find({"likes":{$lt:50 }}).pretty() db.col.find({"likes":{$ne:50 }}).pretty() db.users.find({"likes" : {$gt : 100 }}) db.customers.find({$or : [{key1: value1}, {key2:value2}]}).pretty() db.col.find({"likes": {$gt:50 }, $or : [{"by": "教程"},{"title": "MongoDB 教程"}]}).pretty() / / 支持jsdb.customers.find({$where :function (){ return this.first_name= = "jack"}}) db.customers.find({name:{$regex:"yaolan.com"}}) db.customers.find({name:/ yaolan.com/ }) db.customers.find({name:{$regex:"yaolan.com",$options:"$i"}})
关于统计,排序,分页,分组等
db.collections.help() 查看更多操作
db.collection.find().help();
1 2 3 4 5 6 7 8 9 10 11 12 13 14 15 16 17 18 19 20 21 22 23 24 25 26 27 28 29 30 31 32 33 34 35 36 37 38 39 40 41 42 43 44 45 46 47 48 49 50 51 52 53 54 db.customers.distinct("first_name"); db.customers.count ({first_name:"Jimmy",age:{$gt:1 }}); db.customers.count ({first_name:"Jimmy",age:{$in :[8 ,90 ]}}); db.customers.find().limit(2 ).skip (1 ) db.customers.find().sort({first_name:1 }); db.customers.find().sort({first_name:-1 }); db.customers.group({ key:{age:true }, initial :{customers:[]}, reduce:function (curr,prev){ prev.customers.push(curr.first_name) } }); db.customers.group({ key:{age:true }, initial :{obj:[]}, reduce:function (curr,prev){ prev.obj.push(curr.first_name); prev.obj.push(curr.last_name); prev.obj.push({address:"abc"}); } }); db.customers.group({ key:{age:true }, initial :{obj:[]}, reduce:function (curr,prev){ prev.obj.push(JSON.stringify(curr)); } }); db.customers.group({ key:{age:true }, initial :{obj:[]}, condition :{age:{$gt:7 }}, reduce:function (curr,prev){ prev.list = JSON.stringify(curr); }, finalize:function (prev){ prev.count = prev.obj.length; } });
aggregate 聚合 按照age分组,并以sum的value累计计算和, 聚合,实例类似sql语句: select by_user, count(*) from mycol group by by_user,在上面的例子中,我们通过字段by_user字段对数据进行分组,并计算by_user字段相同值的总和。
1 2 3 4 5 db.customers.aggregate([{$group : {_id : "$by_user", num_tutorial : {$sum : 1 }}}]) db.customers.aggregate([{$group : {_id: "$age",num:{$sum:2 }}}]) db.customers.aggregate([{$group : {_id: "$age",num:{$avg:1 }}}])
管道的概念 管道在Unix和Linux中一般用于将当前命令的输出结果作为下一个命令的参数。
$project:修改输入文档的结构。可以用来重命名、增加或删除域,也可以用于创建计算结果以及嵌套文档。
$match:用于过滤数据,只输出符合条件的文档。$match使用MongoDB的标准查询操作。
$limit:用来限制MongoDB聚合管道返回的文档数。
$skip:在聚合管道中跳过指定数量的文档,并返回余下的文档。
$unwind:将文档中的某一个数组类型字段拆分成多条,每条包含数组中的一个值。
$group:将集合中的文档分组,可用于统计结果。
$sort:将输入文档排序后输出。
$geoNear:输出接近某一地理位置的有序文档。
1 2 3 4 5 6 7 8 9 10 11 12 13 14 15 16 17 18 19 20 21 22 23 24 25 26 db.article.aggregate( { $project : { title : 1 , author : 1 , }} ); db.customers.aggregate({$project:{first_name:1 ,age:1 }}) db.article.aggregate( { $project : { _id : 0 , title : 1 , author : 1 }}); db.articles.aggregate( [ { $match : { score : { $gt : 70 , $lte : 90 } } }, { $group : { _id: null , count: { $sum: 1 } } } ] ); db.article.aggregate({ $skip : 5 });
mapReduce Map-Reduce是一种计算模型,简单的说就是将大批量的工作(数据)分解(MAP)执行,然后再将结果合并成最终结果(REDUCE)。
map :映射函数 (生成键值对序列,作为 reduce 函数参数)。
1 2 3 4 5 6 7 8 9 10 11 12 13 14 15 16 17 18 19 20 21 db.collection.mapReduce( function () {emit(key,value );}, / / map 函数 function (key,values ) {return reduceFunction}, / / reduce 函数 { out : collection, query: document, sort: document, limit: number } ) db.posts.mapReduce( function () { emit(this.user_name,1 ); }, function (key, values ) {return Array.sum (values )}, { query:{status:"active"}, out :"post_total" } )
游标 针对这样的操作,result其实并没有获取到customers中的文档,而是申明一个“查询结构”,for或者next()一次性加载过来,然后让游标逐行读取,当我们枚举完了之后,游标销毁。
索引 1 2 3 4 5 6 7 8 9 10 11 12 13 14 15 16 17 18 19 20 21 -- 性能分析函数 db.customers.find({age:7}).explain(); -- hint 强制使用索引 db.customers.find({gender:"M"},{user_name:1,_id:0}).hint({gender:1,user_name:1}) db.customers.find({gender:"M"},{user_name:1,_id:0}).hint({gender:1,user_name:1}).explain(); -- 建立索引 (`ensureIndex` 将要被 `createIndex` 替代) db.customers.ensureIndex({"first_name":1}) db.customers.createIndex({"first_name":1}) db.customers.createIndexes([{"first_name":1},{"age":-1}]) -- 唯一索引 db.customers.ensureIndex({"first_name":1},{"unique":true}) -- 联合索引 db.customers.ensureIndex({"first_name":1,"age":-1}) db.customers.createIndexes([{"first_name":1},{"age":-1}]) -- 查看索引 db.customers.getIndexes(); --删除索引 db.customers.dropIndex("first_name_1") db.customers.dropIndex({"first_name":1}) db.customers.dropIndexes();
Mongodb复制 mongod –help
主从读写分离(旧版本的,将用replica 副本集代替) 通过主数据库的OpLog日志来复制,如果配置成功可看见sync_pullOpLog
1 2 3 4 5 6 7 8 9 10 11 mongod mongod mongod mongo 127.0 .0 .1 :27017 db.users.insert({name:"tom",age:10 }) db.users.insert({name:"lucy",age:13 }) db.usrs.find();
主从配置好之后,从服务器默认是不可读取的,如果出现了 error: { "$err" : "not master and slaveok=false", "code" : 13435 } 这个错误,需要在从服务器上执行rs.slaveok(),之后再从服务器上查询即可。
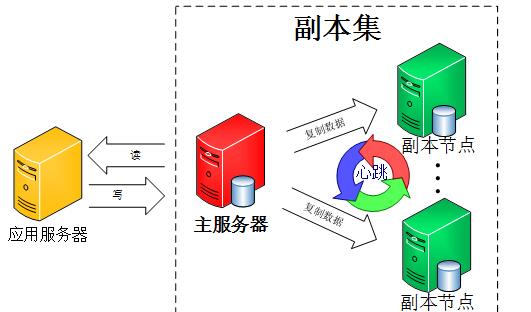
副本集(代替旧的主从)( –replSet)
该集群没有特定的主数据库
如果哪个主数据库宕机了,集群中就会推选出一个从属数据库作为主数据库顶上,这就具备了自动故障恢复功能
N 个节点的集群(至少3个)
我们使用同一个MongoDB来做MongoDB主从的实验, 操作步骤如下:mongod --port 27017 --dbpath=E:\MongoDB\datamaster --replSet rs0rs.initiate()来启动一个新的副本集。rs.conf()来查看副本集的配置rs.status() 命令
在不同机机子上,需要建立集群名称,具体可以参考如下:(示例在一个机子上,用端口区分)
1 2 3 4 5 6 7 8 9 10 11 12 13 14 15 16 17 18 19 20 21 22 23 24 25 26 27 28 29 30 31 32 33 34 35 36 37 38 39 40 41 mongod --dbpath=E:\MongoDB\replsetmaster --port=27017 --replSet replset mongod --dbpath=E:\MongoDB\replsetslave --port=27018 --replSet replset mongod --dbpath=E:\MongoDB\replsetslave1 --port=27019 --replSet replset -- 在任意一个`mongo` 初始化副本集,replset 为上面的副本集名称 rs.initiate({ _id:"replset", members:[ { _id:0, host:"127.0.0.1:27017" }, { _id:1, host:"127.0.0.1:27018" }, { _id:2, host:"127.0.0.1:27019" } ] }) -- 测试同步 mongo 127.0.0.1:27017 db.users.insert({name:"tom",age:10}) db.users.insert({name:"lucy",age:13}) -- 在第二个服务器上查看 db.usrs.find(); -- 如果出现错误`not master and slaveok=false` ,默认是从主节点读写数据的,副本节点上不允许读,需要设置副本节点可以读,然后执行 `db.getMongo().setSlaveOk()` 或者`rs.slaveOk()`即可 -- rs.addArb() 使用这个追加一个仲裁服务器 mongod --dbpath=xxxx --port=27020 --replSet replset rs.addArb("192.168.1.2:27020") -- rs.add 陆续增加更多的副本 rs.add("192.168.1.2:27021")
最后查看副本集状态使用 rs.status() 命令。判断当前运行的Mongo服务是否为主节点可以使用命令db.isMaster(),MongoDB的副本集与我们常见的主从有所不同,主从在主机宕机后所有服务将停止,而副本集在主机宕机后,副本会接管主节点成为主节点,不会出现宕机,无缝切换
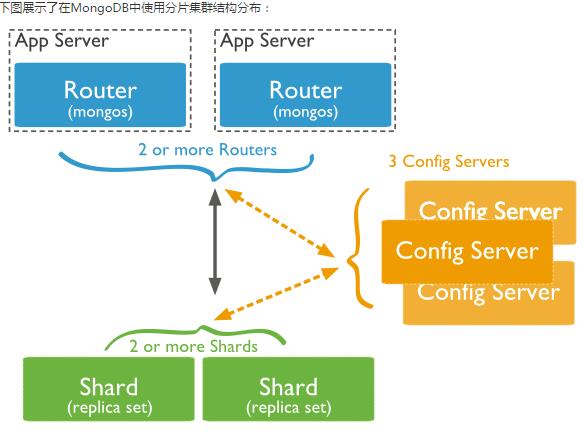
分片技术(Shard) 在Mongodb里面存在另一种集群(cluster),就是分片技术,可以满足MongoDB数据量大量增长的需求。
复制所有的写入操作到主节点
Shard:用于存储实际的数据块,实际生产环境中一个shard server角色可由几台机器组个一个replica set承担,防止主机单点故障
Config Server:mongod实例,存储了整个 ClusterMetadata,其中包括 chunk信息。
Query Routers: 前端路由,客户端由此接入,且让整个集群看上去像单一数据库,前端应用可以透明使用。
模拟在单机上启用不同的端口,分片
1 2 3 4 5 6 7 8 9 10 11 12 13 14 15 16 17 18 19 20 21 22 23 24 25 26 27 28 29 30 31 32 33 34 35 36 37 38 39 40 41 42 43 44 45 46 47 48 49 50 51 52 53 54 55 56 57 -- 服务器分布 Shard Server 1:27020 Shard Server 2:27021 Shard Server 3:27022 Shard Server 4:27023 Config Server :27100 Route Process:40000 -- 1. 启动Shard Server mkdir -p /www/mongoDB/shard/s0 mkdir -p /www/mongoDB/shard/s1 mkdir -p /www/mongoDB/shard/s2 mkdir -p /www/mongoDB/shard/s3 mkdir -p /www/mongoDB/shard/log /usr/local/mongoDB/bin/mongod --port 27020 --dbpath=E:/MongoDB/shard/s0 --logpath=E:/MongoDB/shard/log/s0.log --logappend /usr/local/mongoDB/bin/mongod --port 27021 --dbpath=E:/MongoDB/shard/s1 --logpath=E:/MongoDB/shard/log/s1.log --logappend /usr/local/mongoDB/bin/mongod --port 27022 --dbpath=E:/MongoDB/shard/s2 --logpath=E:/MongoDB/shard/log/s2.log --logappend /usr/local/mongoDB/bin/mongod --port 27023 --dbpath=E:/MongoDB/shard/s3 --logpath=E:/MongoDB/shard/log/s3.log --logappend -- 2. 启动Config Server,这里只有一台config server 如果不是一台,添加 `--configsvr` 参数 mkdir -p /www/mongoDB/shard/config /usr/local/mongoDB/bin/mongod --port 27100 --configsvr --dbpath=E:/MongoDB/shard/config --logpath=E:/MongoDB/shard/log/config.log --logappend -- 3. 启动Route Process,mongos启动参数中,chunkSize这一项是用来指定chunk的大小的,单位是MB,默认大小为200MB. /usr/local/mongoDB/bin/mongos --port 40000 --configdb localhost:27100 --logpath=E:/MongoDB/shard/log/route.log --chunkSize 200 -- 4. 配置Sharding,使用MongoDB Shell登录到mongos,添加Shard节点,然后按照普通的mongo数据库那样,将数据库连接接入接口40000 /usr/local/mongoDB/bin/mongo admin --port 40000 db.runCommand({ addshard:"localhost:27020" }) db.runCommand({ addshard:"localhost:27021" }) db.runCommand({ addshard:"localhost:27022" }) db.runCommand({ addshard:"localhost:27023" }) db.runCommand({ enablesharding:"test" }) db.runCommand({ shardcollection: "users", key: { id:1,time:1}}) -- 或者下面写写法是一样的 sh.addShard("localhost:27020"); sh.addShard("localhost:27021"); sh.addShard("localhost:27022"); sh.addShard("localhost:27023"); sh.enableSharding("test"); -- sh.shardCollection("<database>.<collection>", shard-key-pattern) 按照collection的key来分片 sh.shardCollection("test.users",{"name":1,"_id":1}); -- 5. 插入数据,测试分片 use test for(var i=0;i<=100000;i++) { db.users.insert({name:"lucy"+i,age:i}); } -- 6. 查看分片信息 sh.status()
安全管理
以安全认证模式启动/etc/mongodb.conf,设置auth=true,重启mongod进程。
添加用户
1 2 3 4 5 6 7 8 9 10 11 12 13 14 15 16 -- 创建用户 db.createUser({ "user": "chrisaiv", "pwd": "password", "roles": [ { role: "clusterAdmin", db: "admin" }, { role: "readAnyDatabase", db: "admin" }, "readWrite" ] }, { w: "majority", wtimeout: 5000 } ) 测试数据库安全认证: `db.auth("admin", "123456")`
为数据库写数据(同步到磁盘)加锁db.runCommand({fsync:1,lock:1})
查看当前锁状态db.currentOp()
解锁use local db.$cmd.sys.unlock.findOne()db.currentOp()
数据备份、恢复与迁移管理 1 2 3 4 5 6 7 8 9 10 11 12 13 14 15 16 17 18 19 20 21 22 23 24 25 26 27 28 29 30 31 32 33 34 mongodump - h dbhost - d dbname - c collection - o dbdirectory mongorestore - h dbhost - d dbname - c collection mkdir testbak mongodump mongodump - d pagedb mongodump - d pagedb - c page cd testbak mongorestore cd testbak mongorestore - d pagedb mongorestore - d pagedb - c page mongoimport - d pagedb - c page ### MongoDB 监控 ```sql mongostat mongotop mongotop 10 mongotop
MongoDB 自动增长 MongoDB 没有像 SQL 一样有自动增长的功能, MongoDB 的 _id 是系统自动生成的12字节唯一标识。db.createCollection("counters"),通过db.counters.insert({_id:"productid",sequence_value:0}) 来实现
1 2 3 4 5 6 7 8 9 function getNextSequenceValue (sequenceName ){ var sequenceDocument = db.counters .findAndModify ( { query :{_id : sequenceName }, update : {$inc :{sequence_value :1 }}, new :true }); return sequenceDocument.sequence_value ; }
1 2 3 4 5 6 7 8 9 10 11 12 db.products.insert({ "_id":getNextSequenceValue("productid"), "product_name":"Apple iPhone", "category":"mobiles" }) db.products.insert({ "_id":getNextSequenceValue("productid"), "product_name":"Samsung S3", "category":"mobiles"}) db.products.find()
关于ObjectId
前4个字节表示时间戳
1 2 3 4 5 newObjectId = ObjectId() myObjectId = ObjectId("5349b4ddd2781d08c09890f4") ObjectId("5349b4ddd2781d08c09890f4").getTimestamp() new ObjectId().str
GridFS GridFS 用于存储和恢复那些超过16M(BSON文件限制)的文件(如:图片、音频、视频等)。fs.files与fs.chunks。
1 2 3 4 5 6 7 8 9 10 11 12 13 14 15 16 17 18 19 20 21 22 23 { "filename": "test.txt", "chunkSize": NumberInt(261120 ), "uploadDate": ISODate("2014-04-13T11:32:33.557Z"), "md5": "7b762939321e146569b07f72c62cca4f", "length": NumberInt(646 ) } { "files_id": ObjectId("534a75d19f54bfec8a2fe44b"), "n": NumberInt(0 ), "data": "Mongo Binary Data" } mongofiles.exe - d gridfs put song.mp3 db.fs.files.find() db.fs.chunks.find({files_id:ObjectId('534a811bf8b4aa4d33fdf94d' )})